DYI All-In-One Gaming Console
Hi there, this DYI is about Raspberry Pi in "ALL-IN-ONE" box.
PARTS:
- Raspberry Pi 2 - lying at home - [€42,90]
- Wifi dongle - ASUS USB-N10 Nano - [€9,90]
- MicroSD card, 16GB – [€9,59]
- 25CM TF to micro SD card Flex Extension cable Extender Adapter - [€2,63]
- Wireless Mini Keyboard – [€6,83] -- OR -- use any USB standard keyboard
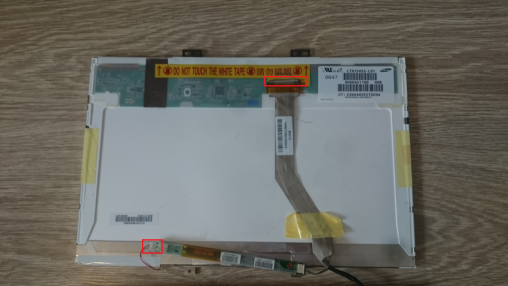
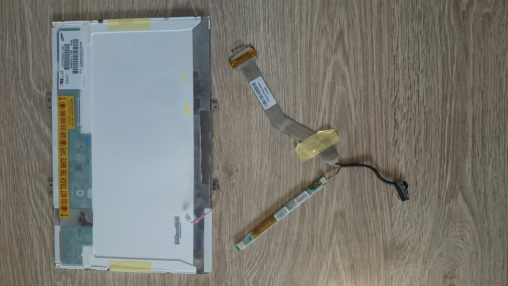
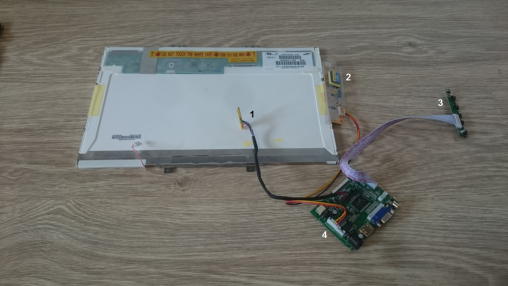
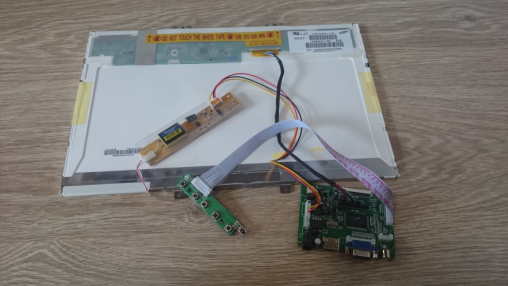
- Samsung LTN154X3-L01 15.4" Laptop LCD Screen - lying at home
- Controller Board + Backlight Inverter + 30P Lvds Cable + Remote – [€35,21]
- Plastic Box - KUGGIS IKEA (26 x 35 x 8 cm) - [€5,99]
- Chopping board (24.5 x 17.3 cm) - [€1,89]
- 2 Ch Digital Stereo Audio 5V Amplifier 3W*2 (PAM8403) – [€1,09]
- Speakers - lying at home
- Power Supply 12V+5V 2A AC Adapter - [€2,88]
- DC Power Male Jack Connector
- Micro USB male - [€0,70]
- 2x USB Male Connector - [2x 0,90€]
- Dual USB Female Connector - [0,90€]
- Plastic screws M2/M3 Male Female Nylon Screws Kit
- Plastic electrical wire molding (used for top & bottom panels) - [€1,24]
Still on my TODO list (optional):
- power, reset buttons & leds - from old PC [€0,99]
- 50mm 12v CPU Fan - OR 80mm fan - [€1,41]
Total prize: €155,66
Notes:
– The price above showing the totals if you don’t have anything lying at home
– Prices may differ, above showing the prices in the time of my order
TOOLS
- screwdriver
- razor blade
- drilling machine + drills
- hot glue gun + glue
HOW TO
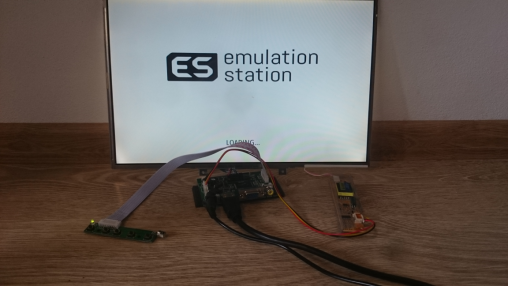
STEP 1: TEST ALL PARTS + LOAD IMAGE
Before you will start with anything related to this DIY, I would like to recommend you to connect all parts somewhere on wooden table, and test if all works as expected.
Images of the PI, and how to for software:
RetroPie Image for the SD card
RetroPie First-Installation
RetroPie Supported systems
STEP 2: DESIGN HOLDER - CHOPPING BOARD
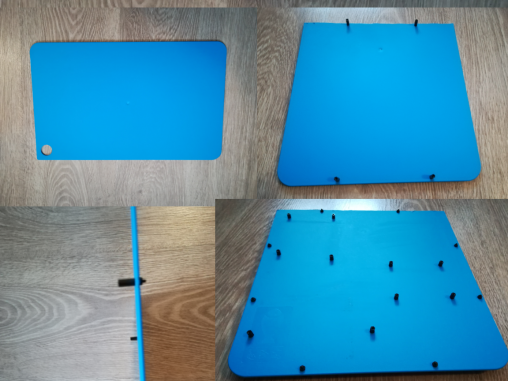
First I was thinking how to fix all in place inside the machine without big hurts. I've chosen the plastic chopping board, which will be fixed to the monitor and will hold all the needed.
So measured and measured, then drill holes and attach the screws.
STEP 3: ADD ALL PARTS TO THE BACK OF MONITOR
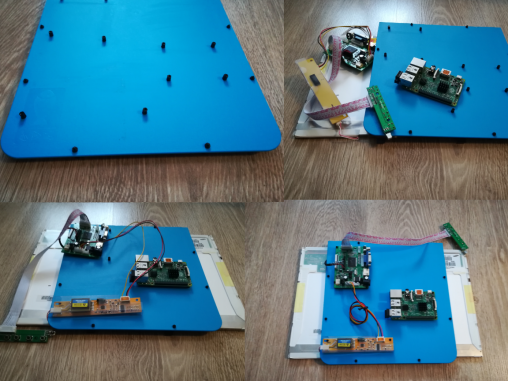
Once screws are in place I've started will attaching all in place.
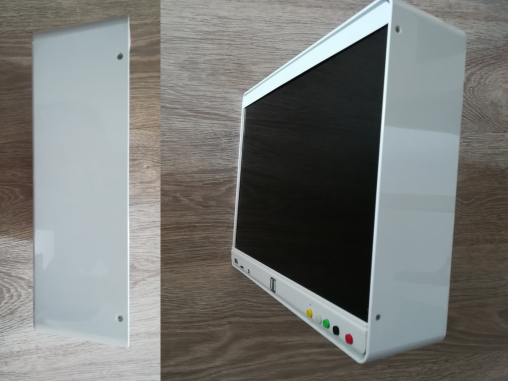
STEP 4: TOP PANEL
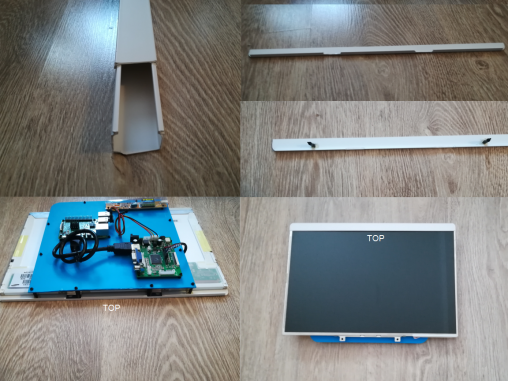
Top panel was the easiest on the whole machine. I've just took the plastic screws and glue it on the cut panel from electrical wire molding.
STEP 5: BOTTOM PANEL
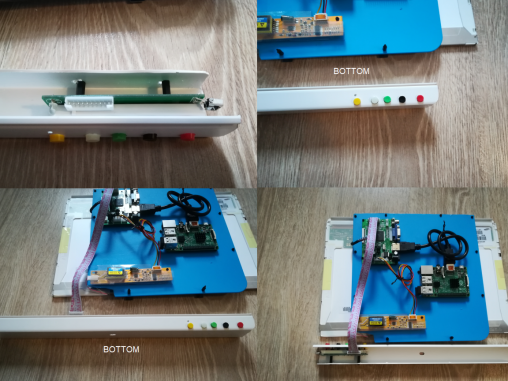
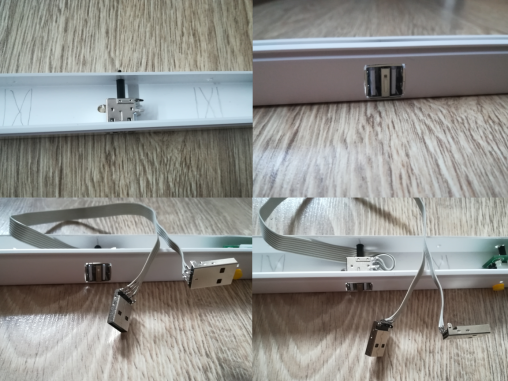
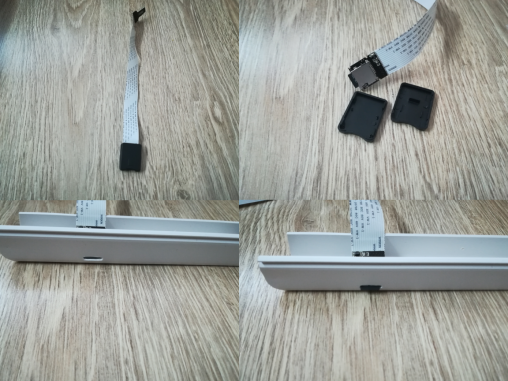
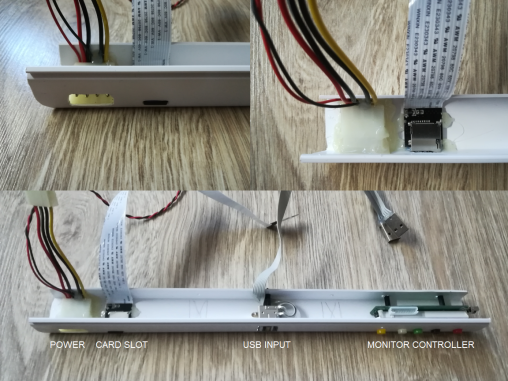
As the opposite, the bottom panel was the hardest part of this project. I need to think carefully were and how to attach power, card slot, usb inputs and monitor controller.
Then with a help of hot glue & screws I've fixed them in place.
STEP 6: BOX
I've measured 4 holes to be drilled into the box so it will hold the LCD (and all underlying hardware). This is the only one drilling needed for the Plastic Box from IKEA.
... So you can reuse it in a case of need :) ...
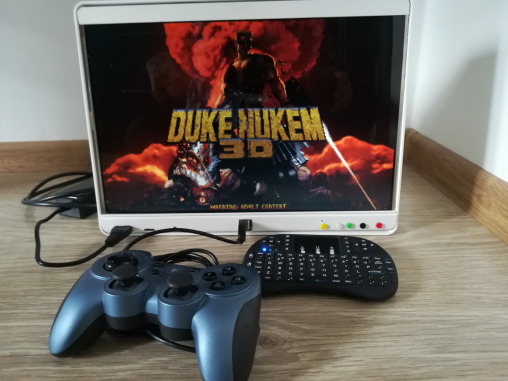
STEP 7: ALL IN ONE - LET'S PLAY!
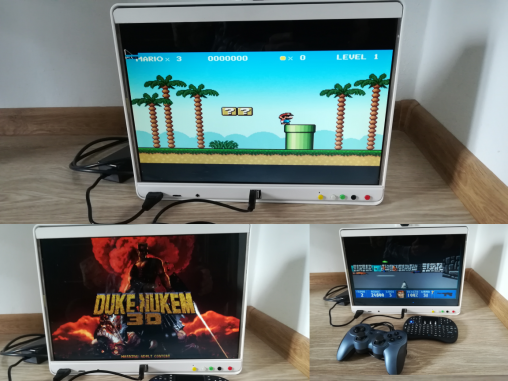
I've tested the machine, all loloks and works nicely.
STEP 8: OPTIONAL: BUTTONS & FAN
You can optionally add power & reset buttons + some fan to cool the machine. One day I will probably add it there...
RESOURCES/OTHER SITES
DIY NES Retro Gaming Console
DIY NES Retro Gaming Console
Hi, welcome to my DIY project. I believe you here, because you would like to build your own "Retro Gaming Console"... Or maybe jusr curious?
Before I start with this DIY just a comment, I've searched over the internet to find the best and possibly cheapest option to create this.
Found several resources (check bottom of this page) and my plans were inspired mainly by the console from Zach on HowChoo.
What I was missing was the reset and power buttons + LED for PI status. You don't really need any extra one.
The PI have the LED so what we need to do is just to reverse it inside the cart - so the LED will be visible at the top of the cart - trough a hole.
For the software I will choose the RetroPie. For me it seems the best one to fit all needs and it support more then 60 systems! WOW! So... let's start...
PARTS
Console:
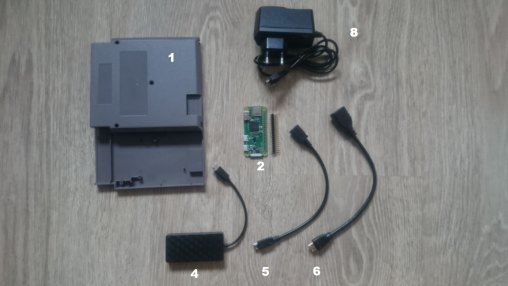
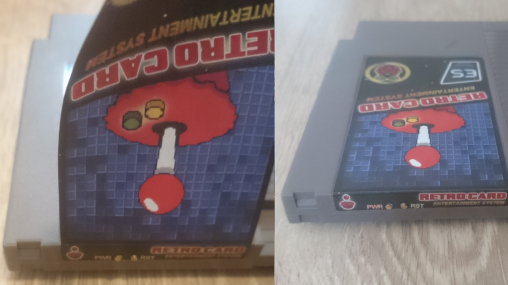
1. NES cartrige - [€3,50]
2. Raspberry Pi Zero W - incl. shipping [€16,63]
3. MicroSD card, 16GB - [€9,59]
4. 3-port USB mini OTG Hub - [€3,34]
5. Micro USB B Male Female M/F Extension - [€0,73]
6. Mini HDMI Male to HDMI Female Cable - [€1,38]
7. Metal Tactile Push Buttons - 5.2*5.2*4.3mm - [€0.60]
Other parts:

8. 5V 2A Micro USB Power supply - [€2,32]
9. HDMI cable for TV - 1,5m - [€1,88] --- OR --- HDMI to VGA adapter - [€5,32]
10.Wired USB SNES Controller - [€2.70] (*2nd controller optional +€2.70])
11. Wireless Mini Keyboard - [€6,83] --- OR ---- any USB standard keyboard
12. NES cartridge dust cover (*optional) - [€0,83]
13. Sticker (*optional) - [€1.99]
Total prize: €60,34
Notes:
– The price above showing the totals if you don’t have anything lying at home
– Prices may differ, above showing the prices in the time of my order
HOW TO
STEP 1: TEST ALL PARTS + LOAD IMAGE
Before we will start with anything related to DIY, I would like to recommend you to connect all parts somewhere on wooden table or so and test if all works as expected.
RetroPie Image for the SD card
RetroPie First-Installation
RetroPie Supported systems
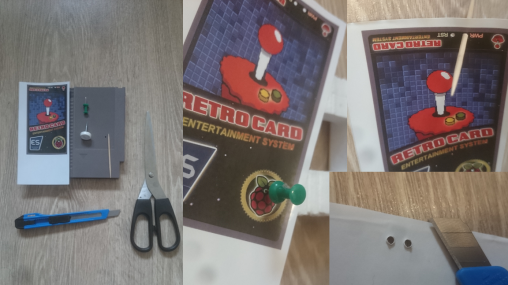
Step 2: Modifying NES cartrige
Tools:
- razor blade
- drill
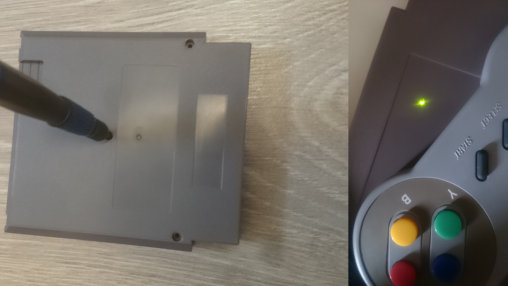
To add various ports in an accessible way, you'll need to remove a piece of the plastic housing near the opening.
Also you need to remove unneeded inside parts and drill 3 holes - 2 for power & reset buttons and one for LED from PI to see status.
So take the razor blade and carefully go back and forth on the longer sides of the housing, until you feel it could go out.
Then just cut the other - shorter sides. Once done cutoff also the two plastic pins inside.
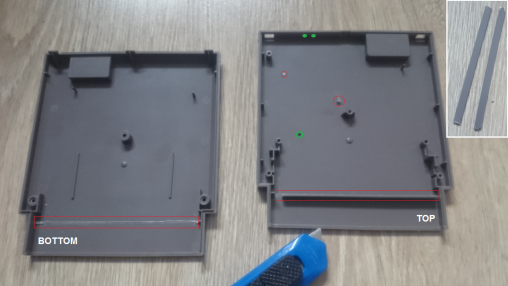 Legend: red - Parts removed with razor blade; green - 3 holes drilled
Step 3: Modifying 3-port USB mini Hub
Tools:
- razor blade
USB which I ordered got the output cable on the side, but to install it inside the NES cartridge you'll need to move it to the back.
The USB Hub does not have any screws, so you've just easily open it and make a similar hole in the back with razor blade.
Besides that HUB had a blue LED, which was not needed, so carefully crack it (*optional).
Then just add the cable at the back of it (new hole) and close it.
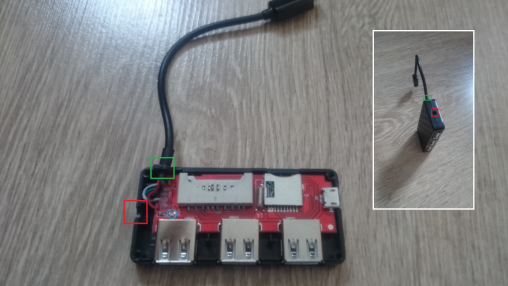 Legend: red - old hole on the side; green - new hole on the back; blue - cracked LED
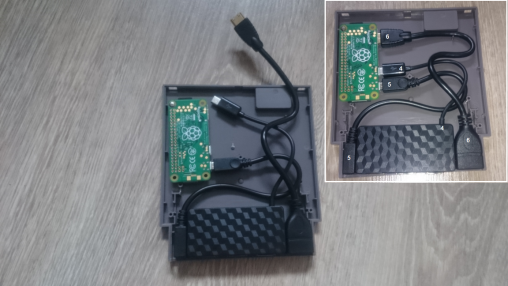
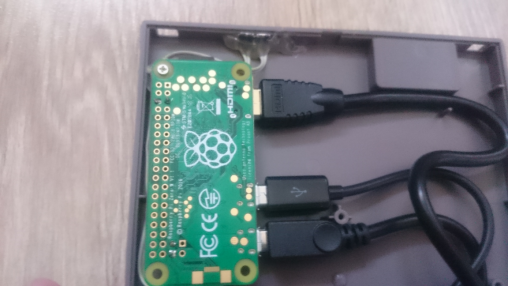
Step 4: Try how parts fits inside!
Now is the time to try PI and all the ports/cables...If all is OK, now you'll need to solder the reset and power buttons.
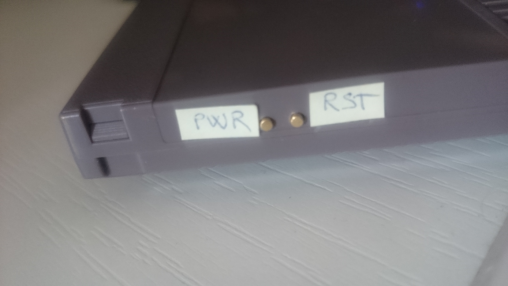
Step 5: Solder buttons to Pi and secure ALL in PLACE
Tools:
- soldering iron (+solder)
- screwdriver
- hot glue gun (+glue)
Below on the picture you can see a GPIO outputs for power on/off button and fortunately pi zero have the pins for reset - so no need GPIO.
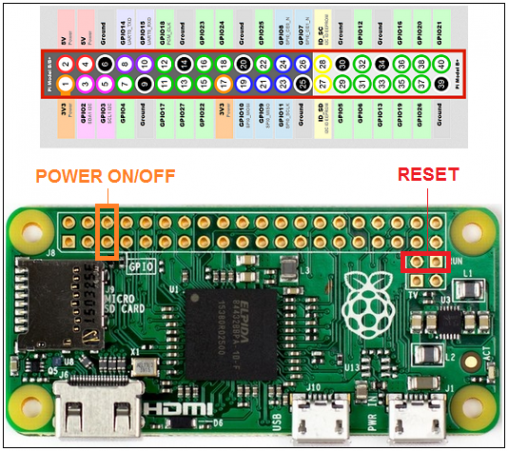
Legend: orange - power on/off button; red - reset button
STEP 6: CODE FOR POWER BUTTON
As the Raspberry Pi Zero W does not have any power button, we need to use 2 GPIO pins (5 and 6) and a piece of code for safely shut down the PI via power button.
Power button is not a must, but I really like the idea to have a power & reset hardware buttons for easy reset or turn off/stand-by.
You need to create 2 files inside the PI. The easiest for me was to run the RetroPie image and push F4 to go into command prompt.
a. Create a file "listen-for-shutdown.py":
sudo nano listen-for-shutdown.py
b. Paste/rewrite the following code into that file:
#!/usr/bin/env pythonimport RPi.GPIO as GPIOimport subprocessGPIO.setmode(GPIO.BCM)GPIO.setup(3, GPIO.IN, pull_up_down=GPIO.PUD_UP)GPIO.wait_for_edge(3, GPIO.FALLING)subprocess.call(['shutdown', '-h', 'now'], shell=False)
c. Then we need to start this script on RPI boot. So we'll save it in "/usr/local/bin"
sudo mv listen-for-shutdown.py /usr/local/bin/
d. Make it executable:
sudo chmod +x /usr/local/bin/listen-for-shutdown.py
e. Now we need to add another script called "listen-for-shutdown.sh" that will start/stop our service. Create the script:
sudo nano listen-for-shutdown.sh
f.Enter the following code in that file and save it:
#! /bin/sh### BEGIN INIT INFO# Provides: listen-for-shutdown.py# Required-Start: $remote_fs $syslog# Required-Stop: $remote_fs $syslog# Default-Start: 2 3 4 5# Default-Stop: 0 1 6### END INIT INFO# If you want a command to always run, put it here# Carry out specific functions when asked to by the systemcase "$1" in start) echo "Starting listen-for-shutdown.py" /usr/local/bin/listen-for-shutdown.py & ;; stop) echo "Stopping listen-for-shutdown.py" pkill -f /usr/local/bin/listen-for-shutdown.py ;; *) echo "Usage: /etc/init.d/listen-for-shutdown.sh {start|stop}" exit 1 ;;esacexit 0
g. Place this file in "/etc/init.d" and make it executable.
sudo mv listen-for-shutdown.sh /etc/init.d/sudo chmod +x /etc/init.d/listen-for-shutdown.sh
h. Now we'll register the script to run on boot.
sudo update-rc.d listen-for-shutdown.sh defaults
i. now go ahead and start it with:
sudo /etc/init.d/listen-for-shutdown.sh start
STEP 7: Test the buttons & Reassemble the cart
Tools:
- screwdriver
STEP 8: Sticker - holes
Tools:
- scissors
- thumbtack smaller
- thumbtack bigger
- toothpick
- razor blade
I've ordered 6 stickers ( 6 because it was on A4 paper size) and I was wondering how to make a nice small rounded holes.
Unfortunately I don't have punch machine at home (another €7 in local store), so used thumbtacks, toothpick and razor blade to carefully create holes that I need.
STEP 9:Sticker - Apply it
Tools:
- only your hands :)
In this step you need to carefully apply the sticker on the card- start from top of the card (where the buttons are).
STEP 10: ALL DONE - LET'S PLAY!
Now it's the time to connect all outside cables to the card and to you TV or monitor!
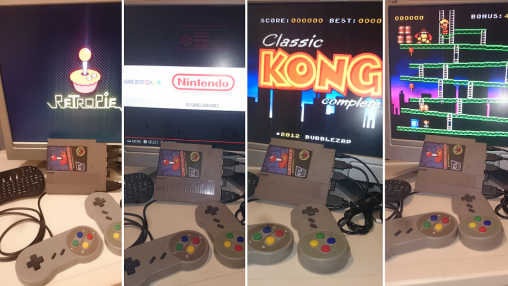 ...aaaand.. Works great!
Resources/other sites
DIY NES CLASSIC
PI Cart Retropie in a NES Cartridge
Retro gaming console
Raspberry PI Zero NES Case Project
nes-cart-retropie.pdf
Build your own Raspberry PI Retro gaming rig
PI cart a Raspberry Pi retro gaming rig in an NES cartridge
How to add a power button to your Raspberry Pi
Retro console NES cartridge using Raspberry Pi Zero
Repurpose old laptop
THE LAPTOP IS STILL WORKING
If your laptop is still working, you can do several awesome things, see below some examples of how to reuse old "working" laptop.
TRY (LIGHTWEIGHT) LINUX OR TURN IT INTO A CHROMEBOOK
Check out my DIY here --> XXX -- OR -- see below links:
Convert it into a NAS or Home Server
Use it for old-school gaming
Transform it into a Digital Photo Frame
Make it a Wireless Bridge
Create tablet
GIVE IT TO YOUR RELATIVE, SELL OR DONATE...
THE LAPTOP IS DEAD
If the laptop is dead, you can still sell it.. OR.. do some awesome DIY stuff, check out some cool examples below. Several of them already done by myself.
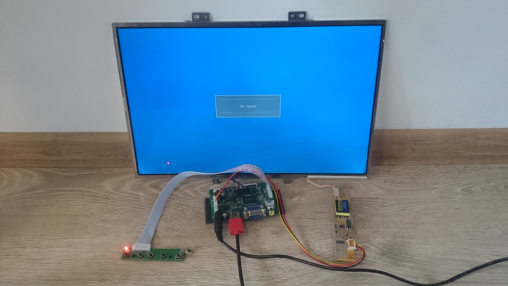
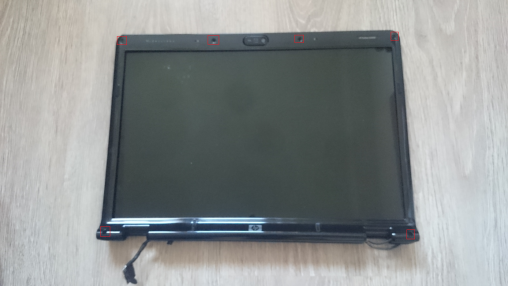
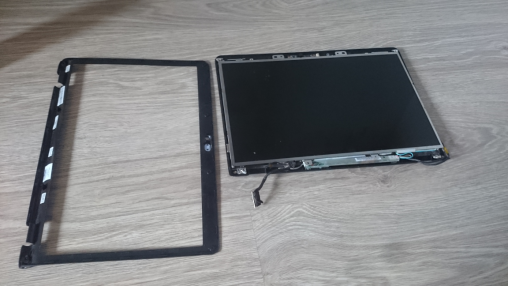
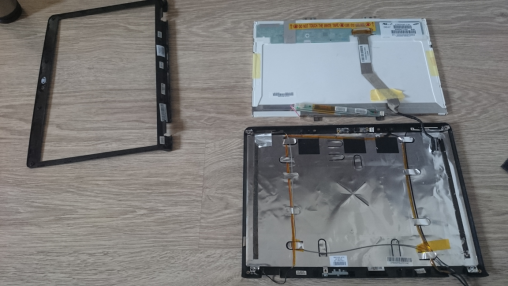
Monitor
If the computer is dead, but the monitor works fine, you might be able to detach it and turn it into an external monitor. It's perfect for adding a second monitor to your existing PC,
hooking up something like a Raspberry Pi, or anything else you might need an extra screen for.
HDD
If the HDD works as well, you can easily turn it into an external HDD. Done this!
Check out how to here --> DIY External USB HDD Drive from old laptop
Optical Drive
If the laptop optical drive is still in a good shape, you can easily do an external CD/DVD drive.
Camera
For the camera - you can do a pretty good USB camera by using a spare USB cable and a little soldering.
BATTERY
You could use the battery to power the pi or other things, but you would need a voltage regulator, so that you did not fry those components, or cause the battery to explode, which would be really bad. TODO list updated..
KEYBOARD
Unfortunately keyboard is just a bunch of keys, so without a controller - which is a part of motherboard it's crap.
Doing some research, it turns out that laptop keyboards don't have the controller circuit inside. They are just the keys with the contacts, and ribbon cable connects those contacts to the controller
circuit on the motherboard.
So there is no way to convert that ribbon cable to a PS/2 or USB interface alone. But anyway here are few tips what can be done:
Touchpad
If you do believe that the touchpad can be used - you can use it as PS/2 touchpad. Also on my TODO list, this touchpad really can be useful again! Stay tuned... Some references:
CPU
Hot cup/plate OR hand warmer.. adding to TODO list. Some references:
CMOS / CLOCK (RTC) Battery
If it is still good, battery can be used in various devices, like kid toys, weather stations, kitchen scales, etc..
Power Supply
You can use old power supply to power another system you need. Example Step down Regulator Modules, which you can use to power your Pi or anything you want.
Or you can use DC 12V 19V 24V to 5V 6A Power Step Down Module 4 Four USB Mobile Car Charger Module for any USB device. Adding to my TODO list...
SPEAKER(S)
Small external speaker(s) for anything.. Just a little soldering, amplifier and one stereo jack.. On my TODO list for now...
Fan
Maybe a desk fan ? Let me think... On my TODO list as well...
OTHER PARTS
Sell or Donate :) Really did not found anything all over the internet + nothing in my mind of how they can be used... But if you have any other idea, please let me know!
Thanks.
DIY USB HDD drive from old laptop
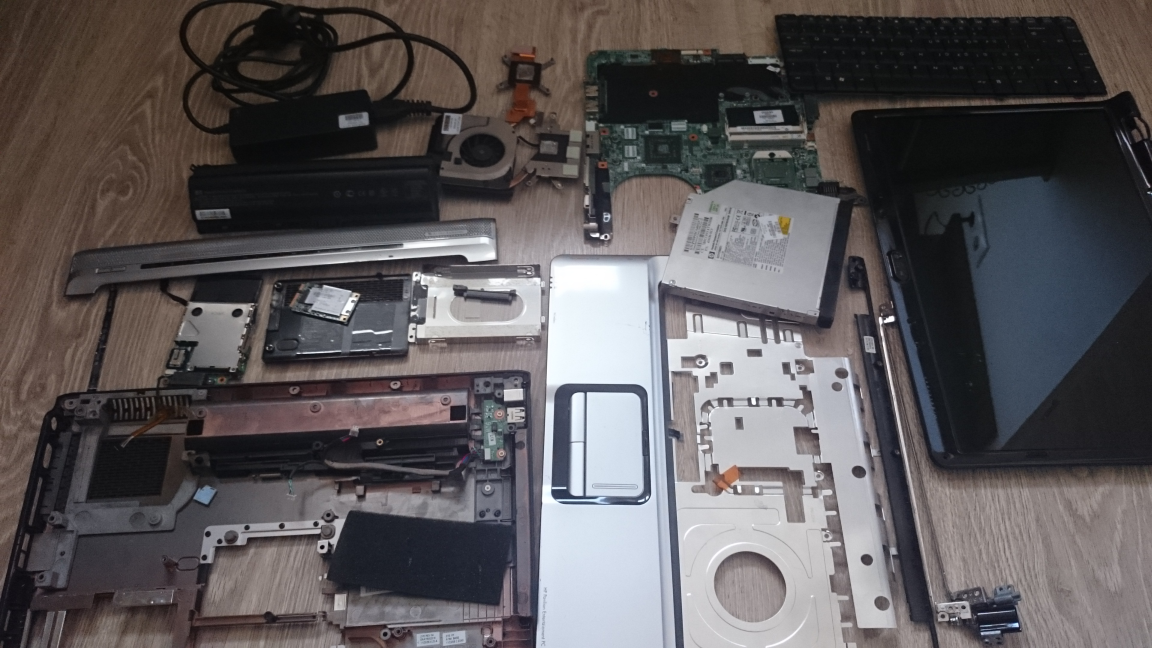
Hi all, this time it will be a very easy DIY or more or less how to re-use the old HDD drive.
When my laptop dies (HP DV 6000 series) - btw a lot of them were dying because the graphic card was heated too much, and overall the whole laptop was not a good design.
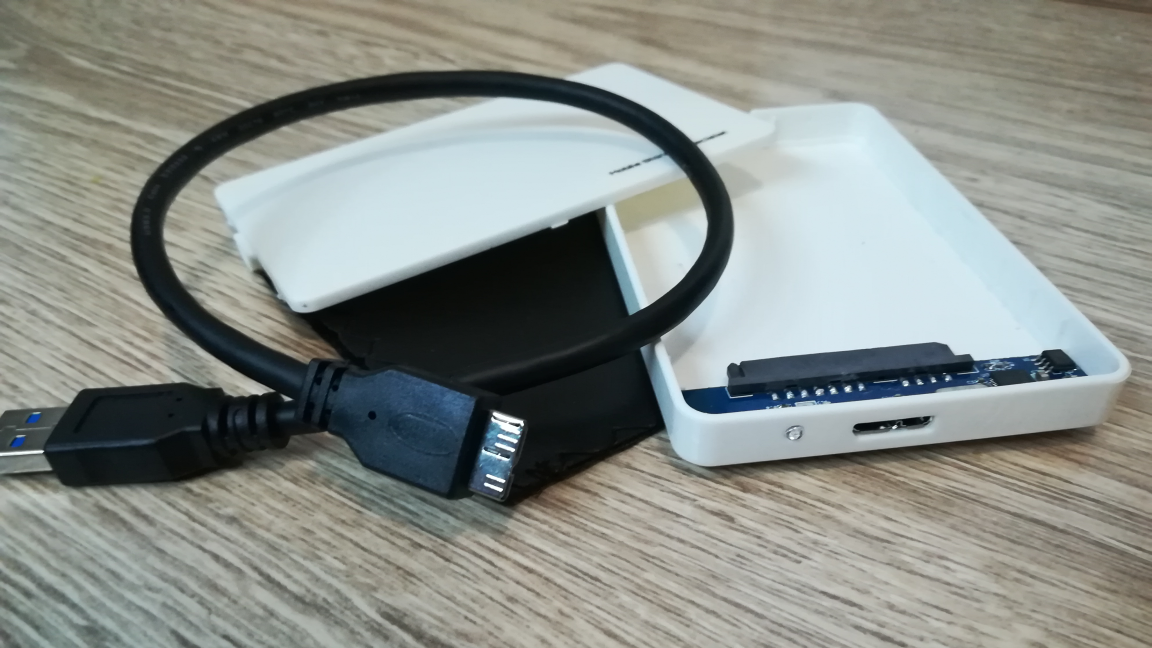
What you need to reuse it, is an external enclosure designed for a 2.5-inch SATA drive.
PARTS
- USB 3.0 Hard Drive External Enclosure Case 2.5 inch SATA
Total prize: €3,64
HOW TO
STEP 1: Detach the HDD from laptop
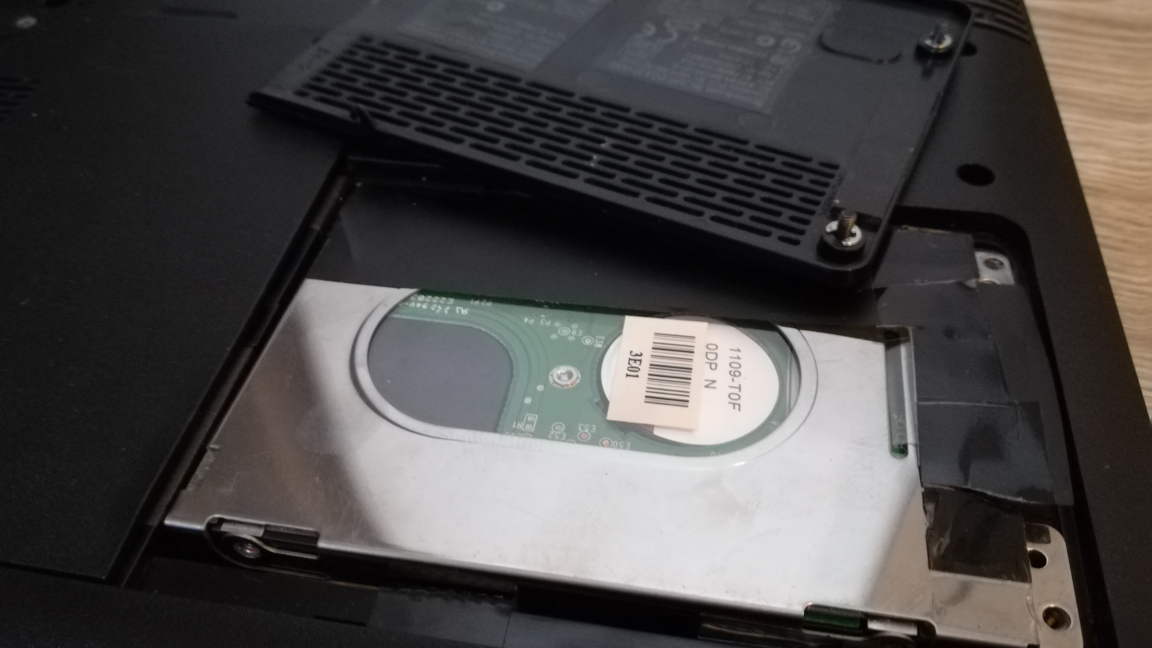
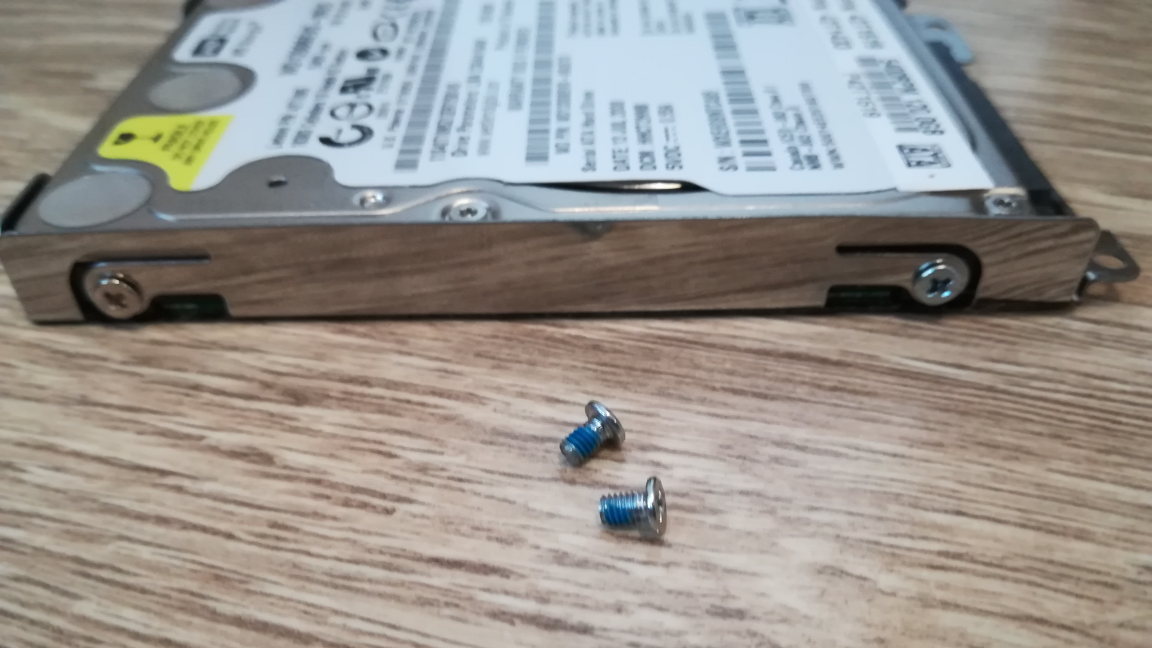
STEP 2: Remove any brackets and screws
STEP 3: Install the HDD into new enclosure
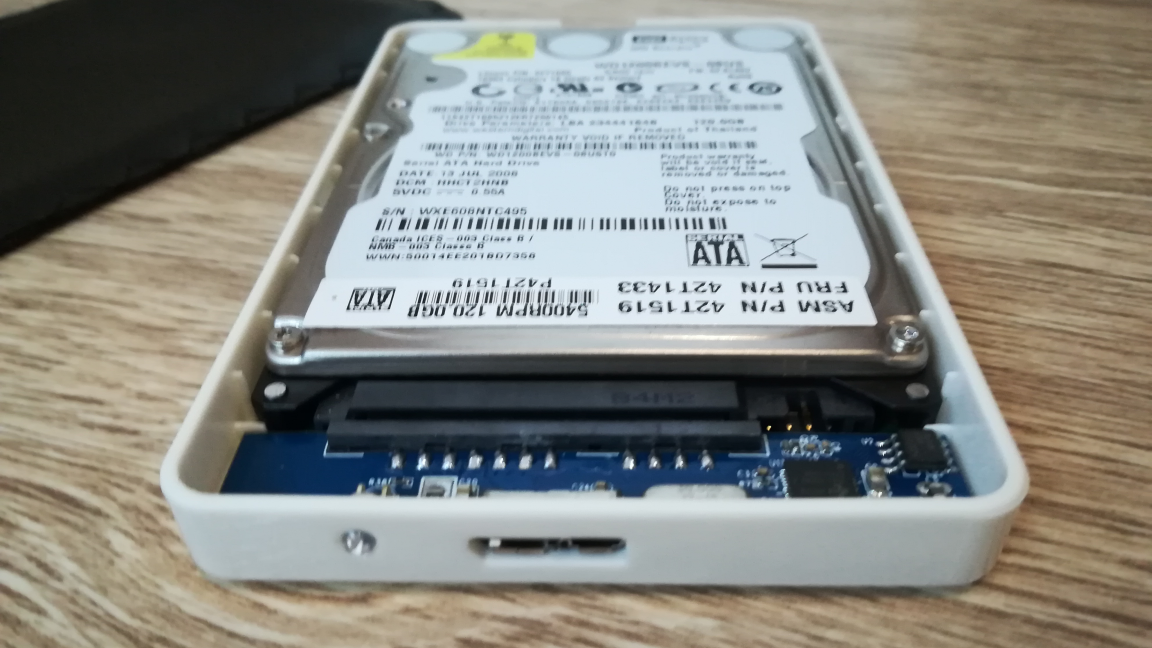
STEP 4: Connect USB cable
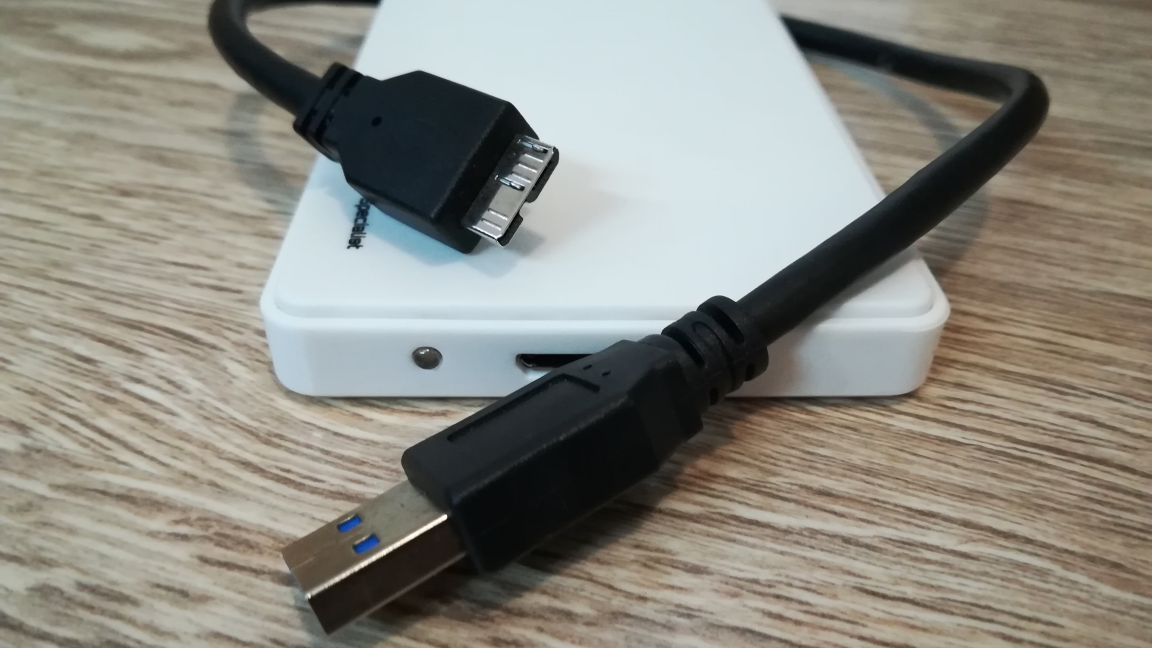
STEP 5: Test the HDD
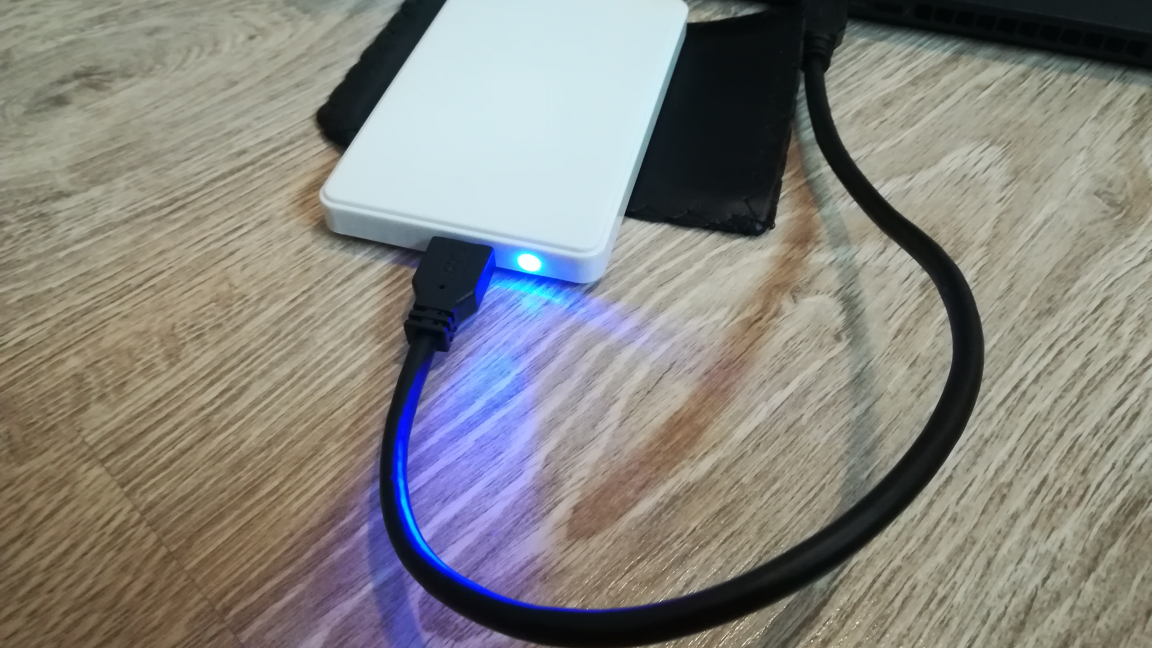 And that's all - easy huh?
Resources/other sites
Turn a laptop hard drive into a portable drive
How to install a hard drive into an external enclosure
8 Projects You Can Make With an Old Hard Drive
DRAFT

Adipiscing magna sed dolor elit. Praesent eleifend dignissim arcu, at eleifend sapien imperdiet ac. Aliquam erat volutpat.
Nullam et orci eu lorem consequat tincidunt vivamus et sagittis libero. Mauris aliquet magna magna sed nunc rhoncus pharetra.